
This is much simpler than I imagined...
Scenario
For my home Wi-Fi, I want a single SSID but I want to place devices (Such as IOT) into different VLANs, but since this is personal use I don't want the headache of certificates that comes with 802.1x / WPA-Enterprise, thus want to keep the simplicity of passwords (WPA2-PSK).
UniFi APs support Dynamic VLAN Assignment, but it wasn't obvious what needs to be done on the RADIUS side... well, it'd be simple for Cisco's ISE but I don't have that at home, so freeadius it is 😜
In this solution there's two key things:
- MAC Authorization isn't a security feature; it's more of a convenience feature, Windows & Linux easily allow changing the MAC address of a network card
- The config below has a default allow that is unknown Mac addresses are permitted
The idea is, I have one SSID for all my devices, new devices "just work" and they can be moved around afterwards. The security of the SSID hasn't changed the strength of the PSK is the key.
The example below assumes you have a working Wi-Fi, with working VLANs and a working firewall/router to connect them together, we start with installing freeradius onto OpenWRT.
Install Freeradius
On your OpenWRT box, install the default packages...
opkg update && opkg install freeradius3-default freeradius3-utils
Now, if you want to be fancy and install just the bare minimum you only need the below packages, this will exclude all the EAP stuff, but you'll have to hack about with the default site and config files to get the service to start properly... you've been warned!
freeradius3 freeradius3-common freeradius3-mod-always freeradius3-mod-attr-filter freeradius3-mod-chap freeradius3-mod-detail freeradius3-mod-exec freeradius3-mod-expiration freeradius3-mod-files freeradius3-mod-logintime freeradius3-mod-pap freeradius3-mod-preprocess freeradius3-utils
Edit Config files
The first step is to define your RADIUS Clients, the things that send authentication requests. The file you need to edit is /etc/freeradius3/clients.conf; the RADIUS packets come directly from the Access-Point so you can either add them one at a time, or add a subnet like this:
Place at the bottom of the file.
client vlan1 {
        ipaddr = 192.168.1.0/24
        secret = correcthorsebatterystaple
}
Now, add the WI-FI Clients to /etc/freeradius3/mods-config/files/authorize
Place at the top of the file.
de:ad:be:ef:00:01       Cleartext-Password := "de:ad:be:ef:00:01"
                        Tunnel-Type = VLAN,
                        Tunnel-Medium-Type = 6,
                        Tunnel-Private-Group-Id = 2

DEFAULT                 Auth-Type := Accept
                        Tunnel-Type = VLAN,
                        Tunnel-Medium-Type = 6,
                        Tunnel-Private-Group-Id = 1
Where de:ad:be:ef:00:01 is the MAC Address of the device, such as your phone or notebook and Tunnel-Private-Group-Id = 2 places the device into VLAN 2. This example places all unknown MAC addresses into VLAN 1
Testing & Logging
With the config files changed, I recommend you stop the radius service : /etc/init.d/radiusd stop and then start freeradius in debug mode: radiusd -X
In debug mode, you'll need to keep your SSH open but you'll see the authentication requests on the screen, if you've made any mistakes it's easier to spot this way.
After testing is complete, you can run /etc/init.d/radiusd start to run it as a background service.
While you are running radiusd -X no logs are produced, the output is to the screen; by default when you re-enable the service the logs will output to disk: /var/log/radius.log. If you want to see the logs in luci then, edit /etc/freeradius3/radiusd.conf change destination = files ➡️ destination = syslog you may also want to set auth = yes so that you see both failed & passed authentications.
UniFi update the SSID
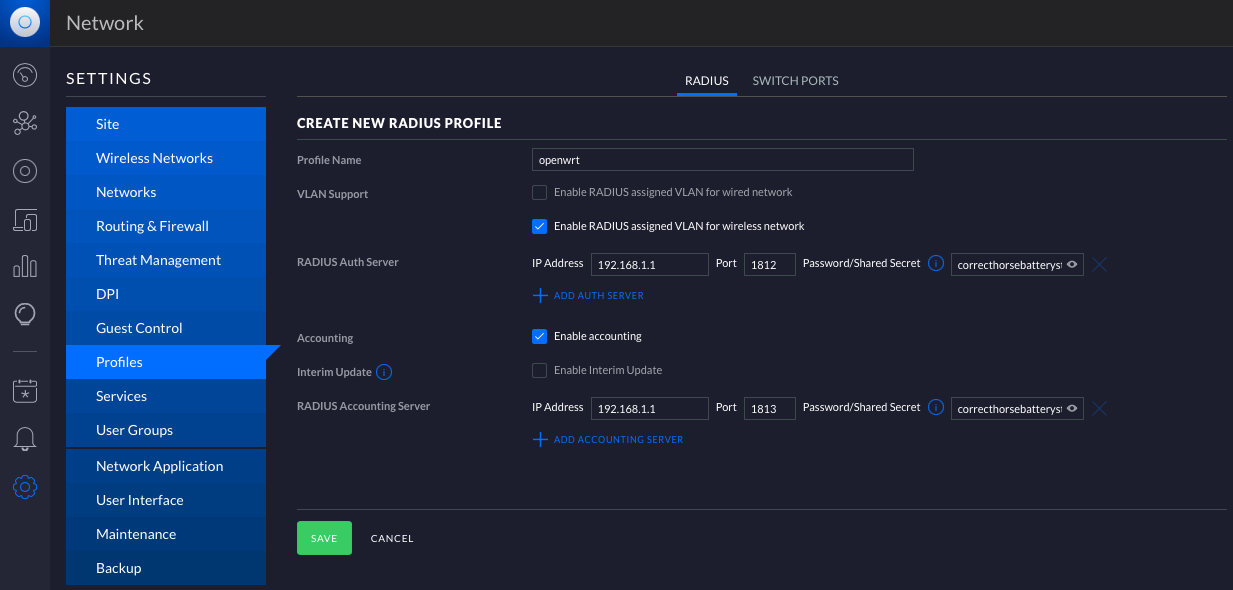
Before changing the SSID, a RADIUS server needs to be defined under Settings > Profiles > RADIUS . The secret is the same secret which was defined above in clients.conf; the IP address is that of your OpenWRT box. Account is optional, enable if logging disconnect events is important to you.
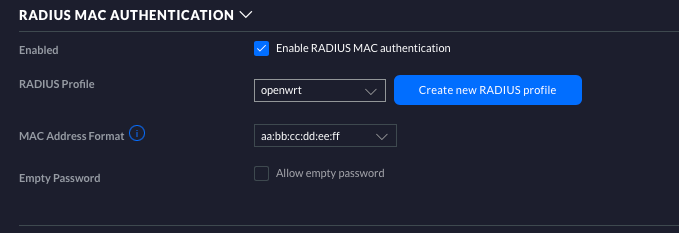
Finally edit your SSID under Settings > Wireless Networks , scroll to the bottom and enable RADIUS MAC Auth, selecting the profile you just created.
If you have freeradius running in debug mode you'll see events when devices try to connect!
/End
Adding new devices is as simple as putting entries into the authorize file with your desired VLAN.
References:
- https://openwrt.org/docs/guide-user/network/wifi/freeradius
- https://neilzone.co.uk/2021/09/using-freeradius-to-assign-vlans-for-unifi-wi-fi
- https://help.ui.com/hc/en-us/articles/360015268353-UniFi-Gateway-Configuring-RADIUS-Server