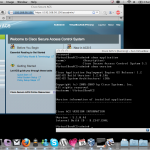
After much swearing and hackerizing I'm happy to post a screenshot of Cisco's ACS running in VirtualBox :)
Before I explain what I've done, a quick message for "the stupids"
No I won't post a virtual machine for you to download
Buy a license or an appliance
The rest of this post is a run though of what I did, if you get bored easily skip to the summary.
The story is I've got a customer who wants dot1x with ACS5 and I need a box to play with before breaking their network; having read through the docs on cisco.com I noticed that vmware was a supported platform for evaluation, as awesome as that is, carrying around an ESXi server isn't as convenient as you'd think so I boldly dropped the CD into my VirtualBox and booted to see what happened.... if only it was that simple!!!!!
As expected the installer crapped out early on complaining that VirtualBox is not a valid hardware configuration, so I decided to have a poke around the ISO image and had a moment of realisation.. THANK YOU CISCO FOR CHOOSING CENTOS!
Cisco choosing an open-source installation mechanism means that with a bit of googling I could customise the install process to work in VirtualBox.... sweeet!
To get started I followed the install guide to build a VirtualBox appliance that resembled the supported vmware machine, some things to note:
- The disk is on a SCSI controller
- The processor is PAE
- You need a serial port enabled
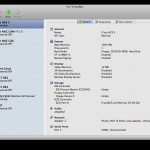
This is a summary of my VirtualBox configuration...
- General
- Name: Cisco ACS 5
- OS Type: Red Hat
- System
- Base Memory: 1024 MB
- Processor(s):1
- Boot Order:Floppy, CD/DVD-ROM, Hard Disk
- VT-x/AMD-V:Enabled
- Nested Paging:Enabled
- Display
- Video Memory:12 MB
- 3D Acceleration:Disabled
- 2D Video Acceleration:Disabled
- Remote Display Server:Disabled
- Storage
- IDE Controller
IDE Primary Master (CD/DVD):Empty - Floppy Controller
Floppy Device 0:Empty - SCSI Controller
SCSI Port 0:CiscoACS.vdi (Normal, 65.00 GB)
- IDE Controller
- Misc
- Audio
Disabled - Network
Adapter 1:PCnet-FAST III (Host-only adapter, 'vboxnet0') - Serial Ports
Port 1:COM1, Disconnected - USB
Disabled - Shared Folders
None
- Audio
If you're hoping to follow my process, I assume you've already downloaded from cisco a copy of the ACS_v5.1.0.44.iso and sorted an eval license.
Looking at the contents of the CD I could see that the KickStart file
was rejecting my hardware configuration. In my early attempts I edited
ks.cfg removing everything between %pre and %post removed the line
that said %include and rebuilt the ISO; this had limited success, I
could boot further on my new ISO but found that anaconda crapped out as
it was unable to find the CD from which it booted ... Very Odd!
Messing with the kickstart file and having to rebuild the ISO each time
got boring very quickly, especially since it wouldn't boot into anaconda
stage two. I decided to move to a network based installed, I setup a web
server on my laptop, downloaded
CentOS-4.7-i386-bin1of4.iso
and booted my guest from that using linux askmethod at the loader. On
my web server I copied the contents of the ACS CD into a directory
(including . hidden files), during the centos boot I was able to
install "everything" from the ACS directory on web server giving me yet
more limited success (Everything was installed - including the Cisco
packages - but unusable).
The next step was to get my web installation to read my kickstart file,
the ks.cfg has a load of finalization which looked like it created files
that the cisco packages would need. I had to change the permissions of
the directory to give me write access (CD files copied as RO since the
CD was RO). So my edited ks.cfg has nothing between %pre & %post
plus the %include line deleted, the result had massive drawback, I'd
inadvertently removed the disk layout; I have since concluded that my
earlier attempt with everything installed but broke also had issues due
to incorrect filesystem partitions.
To put the filesystem layout back into the kickstart file I inserted the following:
part / --fstype ext3 --size=100 --grow
part /localdisk --fstype ext3 --size=5120
part /recovery --fstype ext3 --size=1008
part /storedconfig --fstype ext3 --size=981
part /storeddata --fstype ext3 --size=2048
part swap --size=2048
To get the Centos Server to now boot from both the kickstart file and
install from my webserver I now have to boot with
linux ks=http://192.168.56.1/~nick/ACS/ks.cfg (this is instead of
linux askmethod) and replace the line that says cdrom with
url --url http://192.168.56.1/~nick/ACS.
After all that trial & error I was finally there! I have attached my ks.cfg for your reference and here is a summary of the steps to reproduce.
- Download ACS
- Download Centos
- Install a web server
- Copy the contents of the ACS CD to your web server (look out for .discinfo)
- Replace ks.cfg with your edited version (or mine)
- Create a virtualbox machine
- Boot the VirtualBox machine from the CentOS CD with linux ks=http://URL
- As soon as you see a blue "installer" screen eject the CentOS CD
- Wait
- Done
Note: During my playing the anaconda installer crapped out a couple of times, just starting the process again seemed to fix the issue, some bottleneck on virtualbox disk accesses could be the problem.
Hope that all makes sense, happy hacking!


